Once upon a simpler time, it used to be that you just told your loved ones that you were getting married, and they got you stuff. Okay, maybe you ended up with something that didn't match your color scheme, or with three toasters. But you, as the bride, didn't have to worry about it. The gift-giving was up to the guests.
Until the invention of the Wedding Registry.
Now, the bride (and sometimes groom) agonizes about where to register, what to register for, how many to register for, do we have enough items, do we have the right colors... in short, it's kind of a pain. Granted, just clicking willy-nilly, adding anything that you've ever dreamed of owning onto your registry... that can be fun. Fun, but really impractical.
Here are some tips to make registering for wedding gifts worth your time and focus.
1. Choose where you register wisely.
If you never shop at a store, don't have a store nearby, or a store is very selective on what they sell, you may not want to register there. You'll most likely end up returning items or have gift cards to use from wherever you register, and choosing a store that's an hour or more away can be extremely inconvenient. Pick stores nearby you, preferably those that have a website or are a national chain, so your guests can easily use your registry. Make sure that you choose stores that you will or have shopped at for everyday items. Sure, Fancy Schamncy Brothers has that nice china pattern, but if you
never, ever shop there otherwise, how will you spend that $300 gift card
your great-aunt gave you? It'll be really difficult to spend the gift card money or store credit for returned items if the store only sells a select few types of items or if you don't typically shop there. I'd suggest only registering at two or three stores. It makes returns easier, gives you some variety without being overwhelming, and gives your guests a choice.
2. Know what you need.
This is one tip that I didn't follow, and wish I could have. It's nice to know where you'll be living before you register for gifts. I didn't have that option, but if you do, use it to your advantage. You know the size of the space you'll be living in, and you know what you and your betrothed already have. For example, I knew that we needed a new toaster. However, if I had known that my kitchen would be so tiny, I wouldn't have chosen the beautiful, but enormous monstrosity of a toaster I chose. Knowing what size of bed you have is important, too- don't register for king sized sheets when you have a queen sized bed. Or vice versa. Also, know what you don't need. An ice cream maker, for instance. When are you gonna use that? And where, in the name of pizza, are you going to put it until you do? Sure, it looks fun... until you've been to every store in the tri-state area trying to return it and you find out that it must have just appeared from thin air. Careful what you click on.
3. Update, update, update.
You'll most likely be receiving gifts at a couple of different times during your engagement. You may receive gifts when you announce you're engaged, although this is becoming a little less common and you most likely will not have a registry by then. You will most likely have at least one bridal shower (I was blessed with three), and you'll be getting gifts at your wedding, as well. A lot of online registries are set up so that when a loved one buys you an item off of your registry, the site automatically removes the item from your list or marks it "purchased." That is a heck of a nice feature. However, some of your guests may buy something from your registry and forget to tell a cashier that it's a registered gift, so the item won't make it off the list. Or a guest may buy an item that's similar to something on your registry, but it's not the exact item on your registry, so it won't remove the original registry item (like if Aunt Nell buys you a seven-speed blender, but you registered for the five-speed, so the registry still says you need a five-speed blender.) That's how I got three blenders. As you receive gifts, update your registry.
4. Make sure that your online registry is marked "allow gift cards."
Let's be honest brides, here. Sometimes, as you're looking over your registry, you'll think, "Hmm. I'd almost rather have the money." Really. In your deepest, darkest places, you wish your friends and relatives would just hand out the cash. Some of them will. But I'm telling you, gift cards are the next best thing. For me, gift cards have been so wonderful because I really didn't know what I needed right off the bat (see #2). I really needed a good, heavy duty rug for in front of my door, but I didn't know that until a week into marriage when HH told me that he's been basically undressing on the porch so he didn't track in all kinds of mud. A gift card got me that rug. As long as you have gift cards from places you'll purchase stuff from, gift cards pretty much heaven sent. One of the stores where we registered is a department store. I just used some of our wedding gift cards to buy a couple clothing items for this fall from there. Gift cards rock.
5. Be prepared to return and recycle.
As much as you love your Aunt Sylvia, your Uncle Freddy, and Cousin Karen, and value the time and effort they put into coming to your wedding and finding a gift they thought you'd love, you really don't need three blenders. Return, return, return. Make sure that you're not (as I often do) making the decision of which blender stays based on which relative you think would be most offended. Judge your gifts on the content of their character, not on the content of the character of the person who gave it. Furthermore, be prepared to recycle. If you receive something that's not off your registry (ie you have no idea where it came from) or something from a specialty store (like Thirty-One or Pampered Chef), or something that has no receipt and you can't return, be ready to re-gift or sell. Zeke and I got three of the large cooler bags from Thirty-One. Three. We not only don't have space to store them, but Zeke already had like, seventy million cooler bags before we got married. I'm selling two of them on Craigslist.
There you have it! 5 of the most important things I've learned about wedding registries. Hope it helps!
Showing posts with label Budget Bride. Show all posts
Showing posts with label Budget Bride. Show all posts
Friday, September 7, 2012
Tuesday, August 28, 2012
Budget Bride: Unity Braid
I don't really know if this post can be considered a Budget Bride post... mostly because I really had very little to do with making this thing. This DIY project was all Zeke. He got the wood for the base, he structured the cross and figured out how to mount the thing... I have no idea how he did it, so I can't give you any kind of tutorial or tip.
But I'm posting about it anyway! Why? Because I think that a unity braid is a great alternative to the unity candle. Or unity sand. Or unity been-there-done-that.
I've always liked the idea of the unity braid (sometimes it's called a Cord of Three Strands) because it really embodies what a marriage (at least a faith-based marriage) is all about. Both Zeke and I have very distinct personalities, very unique characteristics. We didn't lose those characteristics when we said our vows. No, we're still ourselves. That's symbolized by the two different colors, the orange and blue, in our braid.

At the same time, our marriage is made complete and strong only because we have another strand in our braid- God. He's represented in our braid by the lighter (almost white-beige) strand. Like it says in Ecclesiasties, "A strand of three is not easily broken." We were brought together by the Lord. We will remain strong in the Lord, and He alone will get us through our times of trial and will keep us together.
Zeke made our unity braid in the shape of a cross. He actually tied the top part of the cross before the wedding, and then we braided together the bottom part. I'd never seen anything like that before. When I asked him to be in charge of the unity braid, I was picturing just a simple braid. He totally went above and beyond with the cross shape.
It's so fitting, though. By forming a cross with our braid, we're saying that our marriage will be a reflection of the kind of love that led the Son of God to die for humanity and take away our sins. We're saying that individually, we are strong and beautiful, but by being braided together, we are more than the sum of our parts. Our marriage is bigger than just Zeke and Adrie. Three little ropes are okay, but when they're braided together, there's so much more there.
Anyways. Now that I've told you the reason behind our using a unity braid, I'll fill you in on the very few details that I know. The strands themselves are actually rope used for boat tie-downs. I thought they were pretty, there were lots of colors to choose from, and we were running low on time, so that's what we went with. I would have preferred to use a true white for the strand representing God, but there wasn't one
available. In the end we went with a beige cord. It has red flecks in it, which made me think of the sacrifice of Christ, so that made up for it not being white, I think.
The base was given to us by a woodworking friend at Zeke's old camp. He also made our cake topper. He had a rough piece of wood that he hadn't started working on yet, and it looked great. I actually didn't even think of using it for a unity braid base, but Zeke saw the purpose in the wood and grabbed it.
... and that's all I know. It turned out really cool, though, and it's something that we'll be able to display in our home for years and years to come, unlike a unity candle. It's a definite symbol of our marriage and will remind us of our commitment to be unified with each other and with God as we celebrate our lives together!
But I'm posting about it anyway! Why? Because I think that a unity braid is a great alternative to the unity candle. Or unity sand. Or unity been-there-done-that.
 |
| Our Unity Braid |
I've always liked the idea of the unity braid (sometimes it's called a Cord of Three Strands) because it really embodies what a marriage (at least a faith-based marriage) is all about. Both Zeke and I have very distinct personalities, very unique characteristics. We didn't lose those characteristics when we said our vows. No, we're still ourselves. That's symbolized by the two different colors, the orange and blue, in our braid.

At the same time, our marriage is made complete and strong only because we have another strand in our braid- God. He's represented in our braid by the lighter (almost white-beige) strand. Like it says in Ecclesiasties, "A strand of three is not easily broken." We were brought together by the Lord. We will remain strong in the Lord, and He alone will get us through our times of trial and will keep us together.
Zeke made our unity braid in the shape of a cross. He actually tied the top part of the cross before the wedding, and then we braided together the bottom part. I'd never seen anything like that before. When I asked him to be in charge of the unity braid, I was picturing just a simple braid. He totally went above and beyond with the cross shape.
 |
| Unity Braid |
 |
| During our ceremony- Braiding the Unity Braid |
available. In the end we went with a beige cord. It has red flecks in it, which made me think of the sacrifice of Christ, so that made up for it not being white, I think.
 |
| Unity Braid |
... and that's all I know. It turned out really cool, though, and it's something that we'll be able to display in our home for years and years to come, unlike a unity candle. It's a definite symbol of our marriage and will remind us of our commitment to be unified with each other and with God as we celebrate our lives together!
Friday, August 24, 2012
Budget Bride: Wedding Program Wording
I've had a couple of questions come in about how I worded by beautiful (and simple) wedding programs. I'll break it down for ya!
Keep in mind, my wedding is not your wedding. You may have completely different wedding traditions. The order of ceremonies may be completely different in your wedding than it was in mine. Or maybe you won't want to include musician's names (our musicians were family members). Or maybe you added a totally cool element to your wedding that you'll want to explain. Every wedding is different, so every program is different!
On our wedding programs, I left the front cover blank, with just our two heart logo on it...

...so the wording started on the first "inside" page (which I printed on just plain computer paper). I printed the inside (computer paper) pages front and back, so page two is actually on the back of page one.
Remember, I used fancy fonts for my programs (fonts that won't show up here on the blog, so you'll just have to find your own- I have tips on my post about booklet wedding programs).
Here's the break down:
First Page:
Zeke and Adrie (just our first names here)
Wedding Date
Name of the Church
Location of the Church (town and state)
Pastor Joe Schmoe Officiating
Second Page:
Ceremony
Prelude and Processional
Susie Q (Organ)
Entrance of Bride
Susie Q (Organ)
Welcome
Pastor Joe Schmoe
Giving of Bride
Message
Reading
Lucy Black and Karen White, Sisters of the Groom
Third Page:
Congregational Song
"One in the Spirit," Jimmy Bob (Guitar)
(See last page of program for Lyrics)
Exchange of Vows and Rings
Unity Braid
The braiding of three strands demonstrates how HH and LW are joined by God in marriage.
Soloists: Little Sister and Littler Sister, Sisters of the Bride
Declaration of Marriage
Benediction
Recessional
Susie Q (Organ)
Fourth Page: (I won't bore you with fake names, here... here's the basic order I used...)
Wedding Party
Groomsmen
Name.................Relationship to Groom
Bridesmaids
Name...................Relationship to Bride
Flower Girls
Name...............Relationship to Bride
Parents of Bride
Names
Parents of Groom
Names
Fifth Page:
Grandparents of Bride
Names (I only included those who are still living here)
Grandparents of Groom
Names
Ushers
Name.....Relationship to Couple
The roses next to the guestbook are in memory of (deceased grandparents' names).
Sixth Page:
Thank You!
For sharing in this very special day with us,
For supporting us and encouraging us along the way,
For your prayers and thoughts as we continue this journey together,
And most of all, for being an influence in our lives and making us who we are.
Seventh Page:
(Here I put the song lyrics to the congregational song, which saved us time and hassle with using the church projector.)
Eighth Page:
Crossword Puzzle!
(For this, I actually just used Microsoft Excel. I first figured out my clues, then made the puzzle using a puzzlemaking site. I didn't like the quality of the free printable version, so I just blacked out cells in Excel to make my own puzzle. I used text boxes to number the words up in the corners.)
Inside Back Cover:
(Here I glued the clues to the crossword puzzle)
So there you have it! Our wedding programs worked out great, and a lot of people commented about the crossword puzzle.We included little golf pencils with the wedding programs, too- ones with erasers (fancy). I just know that having to sit and wait for a wedding to start (and most of the time, you don't know all that many people who are there) gets a little boring, and having something fun to do while you wait for the thing to start already can be really great.
The puzzle also sparked some conversation among our guests... we made sure that we used clues and words that encompassed many aspects of our lives. Like, what kind of pet do we have? What was the name of the camp where HH worked? When was LW born? Some of our guests would know each of the answers, but very few guests knew all of the answers.
Anyways. If you have any questions, I'd love to hear them! I'm all about helping the next bride! Thanks for your comments and your searches!
Wednesday, August 15, 2012
Budget Bride- DIY Wedding Flowers- Bouquet Version
Wedding flowers are important. At first, I really didn't think that was the case, because, well, they're just flowers. Keep in mind, though, that those flowers are gonna be in your pictures for years and years to come. Important.
I knew that I wanted roses for my bouquets. The bridesmaids dresses I chose have pretty little rosettes across the bodice, and roses just fit perfectly.

I wanted roses, but I really didn't want to spend money on roses. I also didn't want my roses (the white ones) to yellow before the big day. And so I went to Martha for advice. Martha Stewart, that is. Here's the link: Martha Stewart Paper Roses.
The tutorial details how to make roses out of coffee filters. Yep! All you need is floral wire, floral tape, and coffee filters. Cheap, cute... but here's your warning:
They. Took. Forever.
Just saying. Between the cutting and wrapping and coloring... man. Forever. But the finished project came out beautifully, and were a big hit at the wedding. As an added little bonus, I wrote small notes (in pencil, so it didn't bleed) on the inside petal of the roses. I read somewhere that the best bouquet a bride can carry are the attributes, the attitudes, of the fruits of the spirit. So, I wrote the fruits of the spirit into my bouquet. For my sisters' bouquets, I wrote traits about them that I value- like my youngest sister is always an her own person, so I wrote, "individuality" on one of her roses.
The flowers came out great, and they look very real. I added little twisty wires with sparkly beads to add a little flair to the bouquets, and I hand-tied them myself (with the help of super glue!)
 Oh, and see that boutonniere? That's fake, too! Tutorial here.
I love that I got to personalize the bouquets, that I didn't spend much money on them at all, and the best part is that I'll be able to keep my bouquet forever.

I knew that I wanted roses for my bouquets. The bridesmaids dresses I chose have pretty little rosettes across the bodice, and roses just fit perfectly.

I wanted roses, but I really didn't want to spend money on roses. I also didn't want my roses (the white ones) to yellow before the big day. And so I went to Martha for advice. Martha Stewart, that is. Here's the link: Martha Stewart Paper Roses.
The tutorial details how to make roses out of coffee filters. Yep! All you need is floral wire, floral tape, and coffee filters. Cheap, cute... but here's your warning:
They. Took. Forever.
Just saying. Between the cutting and wrapping and coloring... man. Forever. But the finished project came out beautifully, and were a big hit at the wedding. As an added little bonus, I wrote small notes (in pencil, so it didn't bleed) on the inside petal of the roses. I read somewhere that the best bouquet a bride can carry are the attributes, the attitudes, of the fruits of the spirit. So, I wrote the fruits of the spirit into my bouquet. For my sisters' bouquets, I wrote traits about them that I value- like my youngest sister is always an her own person, so I wrote, "individuality" on one of her roses.
 |
| Can you believe these are made out of coffee filters??? |
The flowers came out great, and they look very real. I added little twisty wires with sparkly beads to add a little flair to the bouquets, and I hand-tied them myself (with the help of super glue!)

I love that I got to personalize the bouquets, that I didn't spend much money on them at all, and the best part is that I'll be able to keep my bouquet forever.

Tuesday, August 14, 2012
Budget Bride- DIY Invitation Tips
I've been a little behind posting about wedding stuff (I know, you miss it! You need more talk of my wedding! Even though it was more than a month ago!)- but hopefully my DIY wedding experience will help someone else out, whether or not I'm posting consistently.
Anyway.
Wedding invitations are ridiculously expensive lately. I don’t know about you, but I personally am not willing to spend upwards of $3.00 per invitation. The price of invitations, I think, really comes from the convenience of simply entering some information and *poof* the invitations show up in the mail!
While that convenience is really nice, I’ve found that with a little extra work, you can make your own invitations (without even purchasing an invitation kit) simply and elegantly for pennies on the dollar.
Here are some tips that I’ve learned during my invitation process:
Paper: I LOVE paperandmore.com for wonderful invitation paper. They have so many options- from linen to cardstock to vellum to metallic, and you’re sure to find your exact wedding colors among their selection. I would recommend first getting a sample of several color possibilities to make sure that the color you see on the screen is the color that you’d be getting.
Paperandmore’s prices are super competitive (I haven’t found anything cheaper), and I was very impressed by how quickly my order came in. They also have great pre-folded, pre-cut invitations, even pocket invitations!
They sell envelopes, as well. I chose to use a linen envelope, but there are also colored envelopes, envelopes with different textures, recycled envelopes… so many options to choose from!
Font: The way your wording looks on a page is a huge part of the style of the invitation. While word processing programs have a great variety of fonts that would work for any invitation style, none of the fonts on my computer were doing it for me.
I chose to download a font online, and then use that font as the “theme font” for the entire wedding. There are a lot of great sites for free fonts online, but I really have had great success with dafont.com. This site allows you to search for different styles of fonts, and even has a directory of artists. I really like Kimberely Geswein’s fonts, myself.
You
will want to make sure that the font is “True Type”- that it will print
as seen on the screen. I (being not so technologically advanced) had
some trouble with figuring out how to download and install the font at
first, but simply searching “downloading font” gave me the steps to do
it.
Consider a Watermark: My invitation paper is beautiful, but with such a simple design, the finished product was a little “blah.” I wanted to add some kind of image, but didn’t want the picture to overpower the rest of the invitation.
Microsoft Word has a watermark feature, in which you can download an image to make as a watermark. I chose a forest tree image for my watermark. The color is a muted gray, and the picture came out so subtlety that it doesn’t overshadow the text, but rather enhances it.
You can also use text as a watermark. Something like your names, a lyrics from a favorite song, an excerpt of your vows… all those things would be super sweet to include in your invitation design.
Know Your Printer: I had the good fortune of having access to an industrial laser printer, with which I printed my invitations. Well, I eventually printed my invitations.
I had every single problem in the book when it came to this printer. First, I couldn’t figure out how to change the input tray, so I printed my invitation on company letterhead rather than my card stock. Then the layout settings were wrong, so I printed only half the invitation, and sideways. Then, just when I thought things were finally working, I jammed the printer so badly that I had to call HH to pull the whole thing apart to fix it (twice).
I ended up wasting about 15 sheets of my card stock. As I told HH, it was like watching my money get torn up and destroyed by that printer. Frustrating.
Long story short: Know your printer before you put your fancy paper through it. Or you’ll end up like me- listening to your fiance try to convince you not to kick the stupid machine while you sniffle back angry tears.
Anyway.
Wedding invitations are ridiculously expensive lately. I don’t know about you, but I personally am not willing to spend upwards of $3.00 per invitation. The price of invitations, I think, really comes from the convenience of simply entering some information and *poof* the invitations show up in the mail!
While that convenience is really nice, I’ve found that with a little extra work, you can make your own invitations (without even purchasing an invitation kit) simply and elegantly for pennies on the dollar.
Here are some tips that I’ve learned during my invitation process:
Paper: I LOVE paperandmore.com for wonderful invitation paper. They have so many options- from linen to cardstock to vellum to metallic, and you’re sure to find your exact wedding colors among their selection. I would recommend first getting a sample of several color possibilities to make sure that the color you see on the screen is the color that you’d be getting.
Paperandmore’s prices are super competitive (I haven’t found anything cheaper), and I was very impressed by how quickly my order came in. They also have great pre-folded, pre-cut invitations, even pocket invitations!
They sell envelopes, as well. I chose to use a linen envelope, but there are also colored envelopes, envelopes with different textures, recycled envelopes… so many options to choose from!
Font: The way your wording looks on a page is a huge part of the style of the invitation. While word processing programs have a great variety of fonts that would work for any invitation style, none of the fonts on my computer were doing it for me.
I chose to download a font online, and then use that font as the “theme font” for the entire wedding. There are a lot of great sites for free fonts online, but I really have had great success with dafont.com. This site allows you to search for different styles of fonts, and even has a directory of artists. I really like Kimberely Geswein’s fonts, myself.
 |
| dafont.com |
Consider a Watermark: My invitation paper is beautiful, but with such a simple design, the finished product was a little “blah.” I wanted to add some kind of image, but didn’t want the picture to overpower the rest of the invitation.
Microsoft Word has a watermark feature, in which you can download an image to make as a watermark. I chose a forest tree image for my watermark. The color is a muted gray, and the picture came out so subtlety that it doesn’t overshadow the text, but rather enhances it.
You can also use text as a watermark. Something like your names, a lyrics from a favorite song, an excerpt of your vows… all those things would be super sweet to include in your invitation design.
 |
| The forest tree watermark that I used |
Know Your Printer: I had the good fortune of having access to an industrial laser printer, with which I printed my invitations. Well, I eventually printed my invitations.
I had every single problem in the book when it came to this printer. First, I couldn’t figure out how to change the input tray, so I printed my invitation on company letterhead rather than my card stock. Then the layout settings were wrong, so I printed only half the invitation, and sideways. Then, just when I thought things were finally working, I jammed the printer so badly that I had to call HH to pull the whole thing apart to fix it (twice).
I ended up wasting about 15 sheets of my card stock. As I told HH, it was like watching my money get torn up and destroyed by that printer. Frustrating.
Long story short: Know your printer before you put your fancy paper through it. Or you’ll end up like me- listening to your fiance try to convince you not to kick the stupid machine while you sniffle back angry tears.
Sunday, August 12, 2012
Budget Bride: Make Your Own Booklet Wedding Programs!
Everybody's making their own programs these days! It's great! There are so many awesome ideas out there about fan programs, programs in fun shapes... too cute. Of course, I had to also try my hand at making programs! Here's how it went....
I didn't include the printing and stuff in this tutorial. Pictures of me printing=boring. So here's what happened "behind the scenes:"
The paper I used for the program covers was the same paper I used for the invitations. I printed the paper with a watermark (again, the same watermark I used for invitations), and then cut each page in half the "long way" with an industrial paper cutter.
I also used the paper cutter to cut squares out of white card stock. Using the heart stamps I used on the invitation envelopes, I stamped each square with two hearts. I used a silver ink.
I printed the "guts" of the programs on regular computer paper, using a two-column format. I decided to use a fancy font (the same one I used for the invitations) from dafont.com. So pretty. I also downloaded a corner border offline, and used that on the corners to make the inside pages even lovelier. I found that I had an extra page to work with after I added all the necessary info. I used that page to add a crossword puzzle about HH and I! So fun. However, I found that I couldn't fit the clues on the same page, so I printed those out on white card stock and cut them out to glue on the back cover. I cut the inside part of the programs in half the long way as well, again using the industrial paper cutter.
I folded the covers in half, folded the insides in half, and got started with the booklets!
 Supplies:
-Ribbon
-Glue Stick
-Scratch Paper
-Hole Punch
-Program Cover
-Program Insides
-Crossword Clues
-Heart Square
Step One: Glue heart square onto front cover

-Make sure to center the square in the middle of the page, top of heart toward folded side.
-Put the scratch paper underneath while gluing to prevent glue from getting everywhere
Step Two: Glue Crossword Clues onto inside back cover

-Cute, huh? We used a crossword puzzle on the last page of the program, and then glued the clues onto the back cover.
-It’s easier if you press one side down first, then use your finger to smooth the rest of the page down (you get fewer air bubbles)
 Step Three: Line up the “Insides”
-Open the inside sheets to the middle and line them up with the cover (fold them together slightly to make sure the folds match up)
-Make sure the pages are centered and line up with the cover
-Hold them tight so they don’t move
Step Four: Punch Ribbon Holes

-In the fold, line the hole punch up parallel to the long edge of the programs
-The punch should be as far towards the middle of the programs as possible
-Look at the outside of the program. The punch hole should be lined up so the fold crease is in the middle of the hole.
 -Punch out the hole. Repeat on the other side.

Step Five: Thread ribbon through and tie on pencil

-Thread the ribbon through the punch holes
-Cross the ribbons into a “T” and pull tight

-I purchased golf pencils from golfpencil.com as little program favors, printed with our names and wedding date on them. The guests used the pencils to fill out the crossword puzzle. Put pencil inside ribbon, tie in knot


Finished! Cute, personal programs!
I didn't include the printing and stuff in this tutorial. Pictures of me printing=boring. So here's what happened "behind the scenes:"
The paper I used for the program covers was the same paper I used for the invitations. I printed the paper with a watermark (again, the same watermark I used for invitations), and then cut each page in half the "long way" with an industrial paper cutter.
I also used the paper cutter to cut squares out of white card stock. Using the heart stamps I used on the invitation envelopes, I stamped each square with two hearts. I used a silver ink.
I printed the "guts" of the programs on regular computer paper, using a two-column format. I decided to use a fancy font (the same one I used for the invitations) from dafont.com. So pretty. I also downloaded a corner border offline, and used that on the corners to make the inside pages even lovelier. I found that I had an extra page to work with after I added all the necessary info. I used that page to add a crossword puzzle about HH and I! So fun. However, I found that I couldn't fit the clues on the same page, so I printed those out on white card stock and cut them out to glue on the back cover. I cut the inside part of the programs in half the long way as well, again using the industrial paper cutter.
I folded the covers in half, folded the insides in half, and got started with the booklets!

-Ribbon
-Glue Stick
-Scratch Paper
-Hole Punch
-Program Cover
-Program Insides
-Crossword Clues
-Heart Square
Step One: Glue heart square onto front cover

-Make sure to center the square in the middle of the page, top of heart toward folded side.
-Put the scratch paper underneath while gluing to prevent glue from getting everywhere
Step Two: Glue Crossword Clues onto inside back cover

-Cute, huh? We used a crossword puzzle on the last page of the program, and then glued the clues onto the back cover.
-It’s easier if you press one side down first, then use your finger to smooth the rest of the page down (you get fewer air bubbles)
 Step Three: Line up the “Insides”
-Open the inside sheets to the middle and line them up with the cover (fold them together slightly to make sure the folds match up)
-Make sure the pages are centered and line up with the cover
-Hold them tight so they don’t move
Step Four: Punch Ribbon Holes

-In the fold, line the hole punch up parallel to the long edge of the programs
-The punch should be as far towards the middle of the programs as possible
-Look at the outside of the program. The punch hole should be lined up so the fold crease is in the middle of the hole.


Step Five: Thread ribbon through and tie on pencil

-Thread the ribbon through the punch holes
-Cross the ribbons into a “T” and pull tight

-I purchased golf pencils from golfpencil.com as little program favors, printed with our names and wedding date on them. The guests used the pencils to fill out the crossword puzzle. Put pencil inside ribbon, tie in knot


Finished! Cute, personal programs!
Friday, August 3, 2012
Budget Bride: DIY Save the Dates or Thank You Cards
I have totally been a slacker when it comes to wedding thank you's. Really.
I was very good with getting all of my wedding shower thank you notes done. Very very good. Wrote them all out the day after each of the showers.
Not so with the wedding gift thank you's. Whoops. Firstly, our printer hasn't been set up (until today), and with moving and resettling and hanging out with my new and very hunky husband, I just haven't gotten to it! Until today.
We've stuck to pretty much the same idea for most of our wedding stationery. We've used postcards! Our Save the Dates, the RSVP cards, and thank you notes (for the showers and now for the actual wedding gifts) have all been postcards. It's a really easy, and pretty darn cheap idea.
To make postcards, you'll just need a picture (or a couple pictures), some cardstock, a printer, and a word processing system. And it's so easy that even Word on Windows 97 works. Oh yeah. I know. Because I have Windows 97. My original computer got stolen... it's a long story.
Anyway. Back to this.
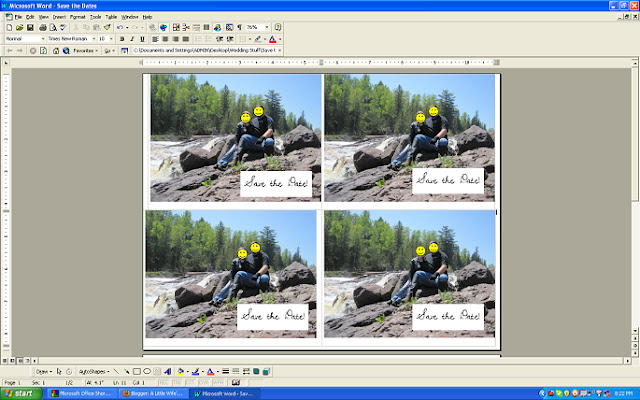
Okay. So you'll need a picture. Put this picture into a Word document (or other word processing document), with a landscape layout. Each page will be split into fourths, so copy and paste and resize your pictures until you've got four on each page.
Then, you can use text boxes to add text to the picture, if you so choose. I put text on the images for the Save the Dates and the shower thank you cards, but not on the wedding thank you cards. You can use any font you'd like, and totally customize what you want to write. It's nice to DIY!
Okay. Now you have the front, or "picture" side of the card. To make the back, or "mailing" side, you can download a free postcard template, or you can make your own. It's pretty simple. You'll want to put the mailing side of the card on page 2 of the same document.

Okay. Now comes the trickier part. You'll want to make sure that the picture is lining up correctly with the postcard template. To do this, I just printed the document (double sided printing), on a piece of computer paper. Save the fancier paper for the real deal, not the test run!
Adjust the mailing side and picture side until you're happy with the end result and everything lines up nicely. Then, print double sided onto your cardstock. If your printer is fussy, make sure you change the printer properties to "Card stock" or whatever paper setting your computer requires.
These postcards do make it through the mail- I've tested and tested and re-tested. And, because the postcards need less postage than a card with an envelope, you'll save some money on postage, too!
I was very good with getting all of my wedding shower thank you notes done. Very very good. Wrote them all out the day after each of the showers.
Not so with the wedding gift thank you's. Whoops. Firstly, our printer hasn't been set up (until today), and with moving and resettling and hanging out with my new and very hunky husband, I just haven't gotten to it! Until today.
We've stuck to pretty much the same idea for most of our wedding stationery. We've used postcards! Our Save the Dates, the RSVP cards, and thank you notes (for the showers and now for the actual wedding gifts) have all been postcards. It's a really easy, and pretty darn cheap idea.
To make postcards, you'll just need a picture (or a couple pictures), some cardstock, a printer, and a word processing system. And it's so easy that even Word on Windows 97 works. Oh yeah. I know. Because I have Windows 97. My original computer got stolen... it's a long story.
Anyway. Back to this.
Okay. So you'll need a picture. Put this picture into a Word document (or other word processing document), with a landscape layout. Each page will be split into fourths, so copy and paste and resize your pictures until you've got four on each page.
 |
| Like so. |

Okay. Now you have the front, or "picture" side of the card. To make the back, or "mailing" side, you can download a free postcard template, or you can make your own. It's pretty simple. You'll want to put the mailing side of the card on page 2 of the same document.

Okay. Now comes the trickier part. You'll want to make sure that the picture is lining up correctly with the postcard template. To do this, I just printed the document (double sided printing), on a piece of computer paper. Save the fancier paper for the real deal, not the test run!
Adjust the mailing side and picture side until you're happy with the end result and everything lines up nicely. Then, print double sided onto your cardstock. If your printer is fussy, make sure you change the printer properties to "Card stock" or whatever paper setting your computer requires.
These postcards do make it through the mail- I've tested and tested and re-tested. And, because the postcards need less postage than a card with an envelope, you'll save some money on postage, too!
Thursday, July 19, 2012
DIY Wedding Centerpieces
I haven't talked about my wonderful wedding in like, one. whole. week. You missed it, I know.
Anyways, I thought that I'd bring back the wedding stuff! Yay!
In an attempt to keep wedding costs low, we decided to make all of our centerpieces as much as possible. We went with three different centerpieces.

Here's the first one. The base is a cedar slab, borrowed from a friend of Zeke's who does woodcarving and burning. We borrowed mason jars from friends. We wrapped burlap around the center ones, and then tied raffia around the middles. We filled them with rocks, then put candles inside. Our Washington relatives brought fresh greenery, and we put some around the bottom. We also bought some fake hydrangeas from Walmart and pulled them apart- a couple little flowers was all we really needed to bring a splash of color to the table. In this picture, you can also see our table labels (click here for wedding table 'number' tutorial).
The second one was a little more intensive, and all about my Hunky Husband. HH got some cedar branches from the camp he used to work at, and cut them into three different sizes. Then he drilled a hole in the middle, and we put tea light candles inside (which was it's own adventure). He also got grapevine from camp, and we wound that up around the candle pillars. We also put some fake moss around the pillars, some orange raffia, and a fake orange flower.You can't really see it, but we borrowed mirrored tiles from church to put underneath.

The third centerpiece! We used more of the cedar slabs and greenery, borrowed some hurricane vases from Zeke's mom, my mom, and Zeke's sister. We used more rocks, and then filled the hurricane vases with water and two goldfish (they went to a good home afterward). It's a little hard to see in the picture, but we also put two small glass votive holders on the sides, and put a tea light inside each of those.We put more hydrangea flowers around these, as well.
The centerpieces looked great. They were all so unique, and the personal touches (like the cedar slabs and branches from Zeke's old camp) made them really special. The tables had a burlap runner on each, which gave a simple and rustic feel to the reception.
We had a lot of help with the centerpieces and with set up, and I think that getting help was one of the best parts- we had a blast with our aunts and cousins and moms getting everything set up and looking good! That's one thing I think I learned from the experience of wedding planning- ask for help, not only because you'll need help to avoid going nuts, but also because it's fun to spend that extra time with your loved ones. The wedding gets so crazy that you really don't have enough time for everyone, so that set-up time is great.
Anyways, I thought that I'd bring back the wedding stuff! Yay!
In an attempt to keep wedding costs low, we decided to make all of our centerpieces as much as possible. We went with three different centerpieces.

Here's the first one. The base is a cedar slab, borrowed from a friend of Zeke's who does woodcarving and burning. We borrowed mason jars from friends. We wrapped burlap around the center ones, and then tied raffia around the middles. We filled them with rocks, then put candles inside. Our Washington relatives brought fresh greenery, and we put some around the bottom. We also bought some fake hydrangeas from Walmart and pulled them apart- a couple little flowers was all we really needed to bring a splash of color to the table. In this picture, you can also see our table labels (click here for wedding table 'number' tutorial).
The second one was a little more intensive, and all about my Hunky Husband. HH got some cedar branches from the camp he used to work at, and cut them into three different sizes. Then he drilled a hole in the middle, and we put tea light candles inside (which was it's own adventure). He also got grapevine from camp, and we wound that up around the candle pillars. We also put some fake moss around the pillars, some orange raffia, and a fake orange flower.You can't really see it, but we borrowed mirrored tiles from church to put underneath.


The third centerpiece! We used more of the cedar slabs and greenery, borrowed some hurricane vases from Zeke's mom, my mom, and Zeke's sister. We used more rocks, and then filled the hurricane vases with water and two goldfish (they went to a good home afterward). It's a little hard to see in the picture, but we also put two small glass votive holders on the sides, and put a tea light inside each of those.We put more hydrangea flowers around these, as well.
The centerpieces looked great. They were all so unique, and the personal touches (like the cedar slabs and branches from Zeke's old camp) made them really special. The tables had a burlap runner on each, which gave a simple and rustic feel to the reception.
We had a lot of help with the centerpieces and with set up, and I think that getting help was one of the best parts- we had a blast with our aunts and cousins and moms getting everything set up and looking good! That's one thing I think I learned from the experience of wedding planning- ask for help, not only because you'll need help to avoid going nuts, but also because it's fun to spend that extra time with your loved ones. The wedding gets so crazy that you really don't have enough time for everyone, so that set-up time is great.
Monday, July 16, 2012
DIY Reception Table "Number" Alternative

There are so many different ways to decorate wedding reception tables, but almost all of them include some kind of numbering or labeling tables. This helps with inviting tables to buffet lines if you're doing a buffet, or helping guests find their seats if you're doing a seating plan (I didn't, actually. It seemed like such a nightmare to worry about!)
Instead of using numbers on our tables, we decided to label them with places that Hunky Husband and I have been together. Here's how I did it.
Here's what I used:
-Cardstock
-A stamp (the one I used on the invitations) and silvery ink
-A glue stick (I used Elmer's brand, the 'craft bond' variety)
-Scissors
-A pen
-A printer (see my tips on using printers here)

First, I made a list of all the places I wanted to include, and made sure that it matched up with the number of tables. Then I found pictures of Zeke and I in each of the places. I printed the pictures onto plain white cardstock and cut them out, leaving a white border.
 | |
| Faces smudged to protect our privacy |
Then I typed out the name of each place (two on each page), printed them out on white cardstock, and used my stamp with a silvery ink to make a little design on each of them.


Then, I took each of the pictures, and traced the size onto the cardstock with the name of the corresponding place.


and took a small rectangle of extra cardstock and folded it in half.
I glued the extra folded cardstock onto the inside of the label card,


and then glued it to the inside of the corresponding picture card.

Note: I found that using an additional piece of cardstock to bind the two cards together makes the labels a little stronger and keeps them standing better.
Sunday, June 3, 2012
Budget Bride- DIY Corsages and Boutonnieres

Remember the tutorial about making fabric flowers? Wondering what to do with 'em? Well here it is! I used my fabric flowers to make boutonnieres and corsages for the groomsmen, dads, moms, grandparents, and other important people in the wedding. Here's how to do it!
Supplies:

-Flower (the ones you made already!)- for the tutorial on these, click here!
-Needle nose pliers/Wire cutter
-Greenery (two small sprigs- I actually separated these from a larger bunch- more bang for the buck)
-Floral Tape
-Beaded wire (pre-made), or other little pretty thing (hair clips work well, or buttons... get creative!)
Step One: Add Greenery

I left a long wire on the flowers, because I didn't know how much wire I would need in the end. To add the greenery, I pulled little sections off of my bigger sprig. The leaf sections of my fake greenery have a hole in between the leaves- perfect to string onto the wire! I used two leaf sections for each boutonniere. Push up the greenery to meet the flower, so it looks like this:

Step Two: Add Beaded Wire (Or whatever you've decided to add)

I then took two of the pre-made wires and lined them up on either side of the flower, making sure to keep the greenery pushed up towards the flower.


Continue to wind floral tape around wires about an inch and a half. This keeps everything more secure, and also makes your finished "stem" a little thicker.
Step Three: Trim extra wire
You'll end up with quite a bit of extra wire at this point. I liked having lots of extra because I think it made wrapping the floral tape that much easier- more to hold on to! But I didn't like the look of the super-long stems.


Then, I bent the remaining wire up toward the flower, making the "stem" the length I wanted.

Step Five: Prettify Beaded Wires

By this point, with all the taping going on, my beaded wires were pretty squished together. Using my fingers, I spread them out to each side of the flower again.

Then, I twisted each wire into a curl around my finger and pulled them gently to spread out the curl.

All Done! You can wrap the stems in ribbons, adorn them with sparkles... it's up to you! Be creative- they'll look beautiful and everyone will be impressed.

Subscribe to:
Posts (Atom)