Our wedding budget is a very small one. Very small. We're trying to cut corners wherever possible, but with huge families on both Zeke's side and my side, corners aren't enough.
And so, I'm attempting DIY most of the wedding. (Read more about that in my first post...)
I say "attempting" because I am definitely no Martha Stewart. I'm like, the antithesis of Martha Stewart. Go look at her website. Seriously. Her workspace is always immaculate. My workspace looks like this:
 | |
| I don't have a desk in my room, so the bed works. Coffee and movies are also required. |
So let's get started- here's how I made fabric flowers! I used theses primarily for boutonnieres and corsages, but this is such a great, cheap, and easy flower to make that you could use them for anything- decorations, get rid of the wire and hot glue or sew them to headbands... so many options.
Materials:
Scissors, some sort of fabric (I used white embroidery material I had laying around), a needle nose wire cutter, sewing needles (preferably one thin and one thicker grade), thread, floral tape, and floral wire.
Step 1: Make a template
I just used a piece of computer paper, drew a flower on it, and cut it out. I would suggest drawing a flower with five petals- it works better for staggering. You can make the template any size, really, but in this tutorial I used a small template.
Step 2: Trace template onto fabric and cut out
(I like to fold the fabric before tracing so I can cut out more than one at a time.)
Step 3: Stagger pieces
Using four of the pieces you cut out, make a stack, staggering the petals.
Step 4: Sew stack together
Step 5: Make Wire Stem
Push the floral wire through the hole you make in your stack. (Budget Bride Tip: I used my wire cutter to cut my wire into fourths. Depending on the length of your original wire, you may want to do the same. Your floral wire should be five to seven inches in length.)
Using your needle nose pliers, loop the end of the wire to prevent it from pulling through.
Step 6: Form the flower
Fold
your stack in half. Then, using the needle and thread, stitch 4-6
stitches along the folded edge. The stitches don't have to be pretty.
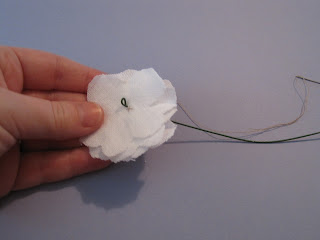
They can look very non-Martha like mine above.
Unfold the stack. Refold your flower in half, the opposite direction of your stitches. Fold the flower in half again.
Using
your needle and thread, stitch along the open fold. You will want about
4 to 6 stitches here. Make sure to stitch close to the stem. The finished project should look a little like the one above.
Step 7: Make it Pretty
Push the fabric to the top of the wire stem, making sure the wire curl pulls down between petals. Twist the fabric to pull the flower upright.
Get your floral tape. (Budget Bride Tip: I like to cut mine in half the long ways. The narrower tape is easier to work with on small flowers, and it saves some money, too!)
Twist the floral tape around the flower, pulling firmly. Wind tape around the wire stem as well.
Admire your finished product! Yay flower!
I used these fabric flowers to make Corsages and Boutonnieres- but you can use them for all sorts of things- put them on wreaths, use them in cute little arrangements, put them on headbands... the sky's the limit!


No comments:
Post a Comment