I was very good with getting all of my wedding shower thank you notes done. Very very good. Wrote them all out the day after each of the showers.
Not so with the wedding gift thank you's. Whoops. Firstly, our printer hasn't been set up (until today), and with moving and resettling and hanging out with my new and very hunky husband, I just haven't gotten to it! Until today.
We've stuck to pretty much the same idea for most of our wedding stationery. We've used postcards! Our Save the Dates, the RSVP cards, and thank you notes (for the showers and now for the actual wedding gifts) have all been postcards. It's a really easy, and pretty darn cheap idea.
To make postcards, you'll just need a picture (or a couple pictures), some cardstock, a printer, and a word processing system. And it's so easy that even Word on Windows 97 works. Oh yeah. I know. Because I have Windows 97. My original computer got stolen... it's a long story.
Anyway. Back to this.
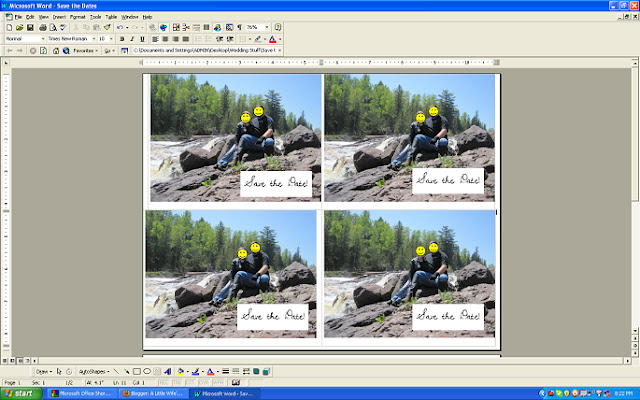
Okay. So you'll need a picture. Put this picture into a Word document (or other word processing document), with a landscape layout. Each page will be split into fourths, so copy and paste and resize your pictures until you've got four on each page.
 |
| Like so. |
Okay. Now you have the front, or "picture" side of the card. To make the back, or "mailing" side, you can download a free postcard template, or you can make your own. It's pretty simple. You'll want to put the mailing side of the card on page 2 of the same document.
Okay. Now comes the trickier part. You'll want to make sure that the picture is lining up correctly with the postcard template. To do this, I just printed the document (double sided printing), on a piece of computer paper. Save the fancier paper for the real deal, not the test run!
Adjust the mailing side and picture side until you're happy with the end result and everything lines up nicely. Then, print double sided onto your cardstock. If your printer is fussy, make sure you change the printer properties to "Card stock" or whatever paper setting your computer requires.
These postcards do make it through the mail- I've tested and tested and re-tested. And, because the postcards need less postage than a card with an envelope, you'll save some money on postage, too!


Post cards are a great idea for thankyous...I've never tried it, though maybe sometime in the future. I think my husband and I are the weird ones--we spent the day after we got married writing out all of our thankyou cards, and had them all to the post office and mailed within the first week. :P
ReplyDeleteRachel- I really wanted to do the same thing! The thank you's have been hanging over my head FOREVER.... thank goodness our printer's installed now! I got them all done within two days of getting the printer set up. Whew!
ReplyDelete